Wednesday, May 8, 2013

Windows - My Drive does not appear in Windows Explorer view

Method 2: Make sure that the drive has a drive letter assigned in Disk Management:

(This method applies to Disk Drives, USB flash drives or CD and DVD drives)

If your hard drive, thumbnail drive, memory stick, or flash memory is recognized in Disk Management but not displayed in Windows Explorer, the drive may not have been assigned a drive letter by Windows.
  1. Open Computer Management by clicking the Start button, clicking Control Panel, and click System and Security viewed by Category View.
  2. Click Administrative Tools, and then double-clicking Computer Management.
    If you're prompted for an administrator password or confirmation, type the password or provide confirmation.
  3. Look for a drive that does not have an assigned drive letter and is not labeled as System Reserved.

    Note:
    The System Reserved drive is reserved by Windows.
  4. Right-click the unlabeled drive and click Change drive letter and paths…
  5. Click Add and then click OK to select the first available drive letter.
  6. If the Change drive letter and paths… option is not available, make sure that the drive is Online.
  7. If the drive is Offline, right-click the disk number and click Online.
For more information on Adding, changing or removing drive letters for Windows 7, click the link below to see the article on the Microsoft website:
For more information on Adding, changing or removing drive letters for Windows Vista, click the link below to see the article on the Microsoft website:
Change, add, or remove a drive letter


Reference:
http://support.microsoft.com/kb/330140

Monday, May 6, 2013

Format USB/SD Card

HOW TO FORMAT A WRITE PROTECT USB DRIVE?

Share Orkut

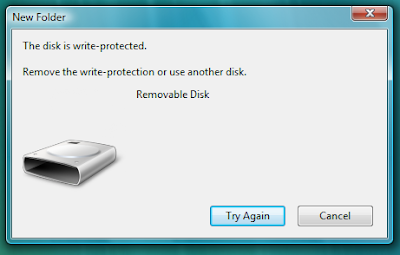
What is Write Protected error and why it happens?
This seems to be the problem of most of us these days and some of our readers who wanted to know the methods how they can remove the Write Protected error from their USB drives like Pen Drives and memory cards. In the Write Protected error, we can’t write or copy any data in our flash drives and even can’t format the drive. There are many reasons that cause this problem, let’s see solutions of them.

Solution 1:
To format a write protected USB flash drive, you must first unprotect it. Most USB flash drives have a tiny switch somewhere around it's casing. You will have to look at it closely because it is sometimes placed where you won't notice it. If your computer says it is write protected, just unplug your flash drive, move the switch to the other end and plug it in again. You will now be able to format it.

Solution 2:
Delete and re-partition the USB drive, using Windows XP. Go to "Control Panel," "Administrative Tools" and "Disk Management." Select the USB drive and click "Delete." Right-click on the empty drive and select "New Partition."

Solution 3:
Just download this helpful software from Here and run it to execute a “low-level format” on the drive. This software is quite handy and may take few attempts to actually remove the error.

After the low level format, you may need to “Partition the drive“. Dont worry, partitioning a pen drive means allocating it its File System and Cluster Size that was lost after the Low Level Format.

Follow this Method:

Run diskmgmt.msc in Run.
In the disk management window, select the pen drive, right click on it and click on Format.
Now choose the File System and Allocation Unit Size and do not check the boxes below.
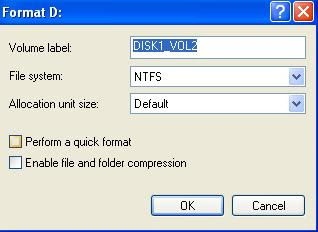
Click OK and the drive will be reusable after this.

Solution 4:
This happens when some virus or script which applies the registry hack to make any drive write protect when connected to the computer, In that case follow the procedure below to remove write protection from your pen drive.

1. Open Start Menu >> Run, type regedit and press Enter, this will open the registry editor.

2. Navigate to the following path: HKEY_LOCAL_MACHINE\SYSTEM\CurrentControlSet\Control\StorageDevicePolicies

Note: If the registry key StorageDevicePolicies key does not exist, you will need to create it

Download this batch file called add.bat from here Download, and double click after download the key will be automatically added to registry.
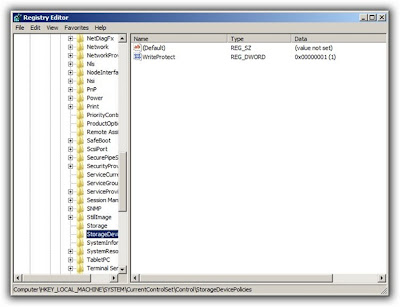
3. Double click the key WriteProtect in the right pane and set the value to 0 in the Value Data Box and press OK button
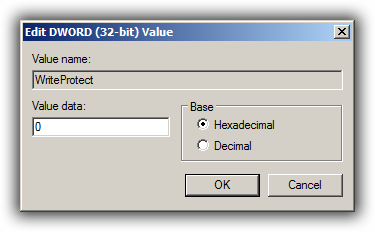
4. Exit Registry, restart your computer and then again re-connect your USB pen drive on your computer. That is it, done.

If you don't find StorageDevicePolicies key in the registry, the best way is to create it yourself. Below is the procedure.

Start the Registry Editor Go to the HKEY_LOCAL_MACHINE \ SYSTEM \ CurrentControlSet \ Control key

If there is no key called StorageDevicePolicies, create it.

You do this by right-clicking the HKEY_LOCAL_MACHINE \ SYSTEM \ CurrentControlSet \ Control key, and selecting New > Key from the menu.
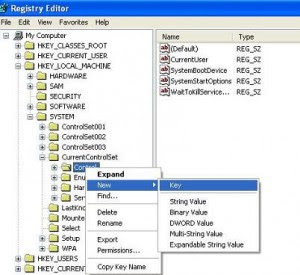
Select the StorageDevicePolicies key

From the menu select Edit > New > DWORD Value
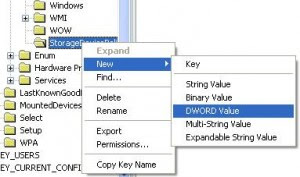
Name the new value WriteProtect

Right-click the WriteProtect value and choose Modify

In the Value Data: box enter 1
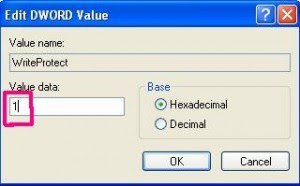
Exit the registry editor, and restart your computer

To reverse, just delete the new WriteProtect value (or set the value to 0) and restart the computer.

Solution 5:
If the above method does not work for you, follow the below steps:

1. Copy all the important data from this drive to your computer because this method will format the drive and erase all the data on the pen drive.

2. Now download the Apacer Formatting Utility Download Here , Unzip this utility to a folder. Keep your pen drive plugged in, and double click on the Start.bat file in the folder where you unzipped the above utility. This will start formatting your pen drive, wait till the formatting completes and the LED on your pen drive stops blinking. Remove your pen drive after than and plug it in again.

The above two steps will solve the problem. If you still face the problem, follow the below steps:

1. Goto Start > Run, type cmd and press enter, this will open command prompt.

2. Type the following command on the command prompt replacing X with the drive letter of your pen drive.

CHKDSK X: /F

The above two methods will help you fix the problem.

Note: For all those who are out of luck in fixing the problem with their portable drives, I would suggest you to get your drives checked or replaced by the manufacturer to fix it for you

Solution 6:
BUT if none of the methods listed above solves your problem then your pen drive might have gone corrupted, so just get it replaced.

Sunday, May 5, 2013

Mobile - Unlock & Root HTC Phone

A. UNLOCK BOOTLOADER.


1/ Tình hình Chung:
- Do một số bạn còn mới sử dụng One X hay Android của HTC còn bỡ ngỡ với cách hướng dẫn Unlock Bootloader của HTC nên mình viết bài này để các bạn có thể thực hiện một cách đơn giản hơn.


2/ Các bước trong quá trình thực hiện:
2.1/ Chuẩn bị:
- Máy bạn phải được cài đặt Driver, có thể tải và cài ứng dụng HTC Sync
www.htc.com

2.2/ Chi tiết tùng bước làm trên HTC DEV.

- Truy cập trang: http://htcdev.com/bootloader
- Tạo một tài khoản cho riêng mình (cần cung cấp một địa chỉ e-mail của chính bạn)
- Sau đó đăng nhập bằng tài khoản của mình và thực hiện mở khóa bootloader.
- Mục select your device chọn dòng máy bạn đang dùng hoặc nếu máy của bạn đang dùng mà không có tên trong danh sách thì chọn All orther supported models
- Nhấn chọn Begin unlock bootloader


- Từ bước 1 tới 4: là các bạn đưa máy vào Hboot kết nối máy điện thoại với máy tính và chọn phần FASTBOOT để nó nhận Driver.


- Bước 5: Mục đích của bước này là ta có đc 3 file adb.exe , AdbWinApi.dll và fastboot.exe ko cần phải loằng ngoằng các bạn tải luôn tải luôn cái này về giải nén folder Android chép vào ổ C của máy tính trong đó đã có sẵn 3 file đó.

- Bước 6,7: Trên máy tính chọn Start > Run > Type CMD, gõ lệnh cd c:\Android

- Bước 8: Chuột phải vào cửa sổ CMD paste dòng này vào: fastboot oem get_identifier_token


- Bước 9: Chuột phải vào dòng mã đó chọn Mark làm theo hình vẽ nhấn Enter để Copy. Lưu ý chọn đúng theo hình. Thực hiện xong bươc này đừng tắt cửa sổ CMD vội. Để đấy tí nữa chúng ta làm bước 12.


- Bước 10: Dán đoạn mã vừa copy vào phần My Device Identifier Token


- Sau khi nhấn Submit các bạn chờ chút nó sẽ gửi hướng dẫn các bước tiếp theo vào Email mà các bạn đã đăng kí tài khoản.
- Bước 11: Mở Email và Tải file Unlock_code.bin đính kèm ở Email gửi về chép vào C:\Android thư mục chúng ta đã tạo ở bước 5.

- Bước 12: Chuột phải dán tiếp dòng lện này vào cửa sổ CMD: fastboot flash unlocktoken Unlock_code.bin


- Bước 13: Màn hình điện thọai của bạn xuất hiện như hình dưới. Tiến hành dùng phím Volum để di chuyển lên và chọn Yes dùng phím nguồn để đồng ý máy sẽ khởi động lại và các bạn vào lại Hboot để kiểm tra xem có Unlock chưa nhé.. (Một số trường hợp khi di chọn Yes nhưng ấn phím nguồn không đc. Nếu vậy thì các bạn chọn về No và ấn phím nguồn lại. Quá trình unlock vẫn diễn ra bình thường)


B. Flash Recovery ClockworkMod


Để up cái rom cook khác nhau, chúng ta phải dùng Recovery ClockworkMod
Thực hiện: Tải file Recovery ClockworkMod
http://www.mediafire.com/?vhhtch774dltzwv

Đưa máy vào chế độ fastboot: Tắt máy, Bấm phím power + volume down để vào bootloader, bấm phím power 1 lần nữa để bào fastboot. Kết nối One X với máy tính để cài đặt driver Giải nén file vừa tải về, vào thư mục fastboot bấm shift + chuột phải, chọn dòng Open command window here Gõ dòng lệnh:
fastboot flash recovery r1-modaco-recovery-clockwork-touch-endeavoru.img

C. Root HTC

+ HTC One X phải được unlock bootloader và cài Recovery ClockworkMod
+ Tải file root: CWN-SuperSU-v0.87.zip
Thực hiện: Download file CWN-SuperSU-v0.87.zip từ link trên (lưu ý không giải nén) Kết nối One X với máy tính dưới dạng ổ đĩa và chép file CWN-SuperSU-v0.87.zip vào ổ đĩa chung.

Đưa thiết bị vào chế độ recovery bằng cách tắt máy,Bấm phím power + volume down, bấm phím volume dơn di chuyển xuống dòng recovery, bấm phím power. Vào recovery , chọn install zip from sdcard, chọn file CWN-SuperSU-v0.87.zip, chọn yes. Khởi động lại máy, One X đã đựơc root.

Re-lock for Guarantee

To re-lock your bootloader, in the command prompt, type: fastboot oem lock.
Note: This will not restore the factory default lock, but will simply re-lock the bootloader so no further changes can be made. Furthermore, if you want to unlock your bootloader again, simply repeat step 12 with your original unlock key file to unlock your phone again.

RED TRIANGLE & EXCLAIMATION MARK


Recovery cua bạn như vậy vẫn là recovery gốc. Làm lại bước B.

CANNOT IN RECOVERY MODE

ENTER FASTBOOT MODE (hold vol down and power button and wait for white screen with colored text, then select fastboot with the vol keys and the power button)
ON PC:
    run cmd
   "cd c:/XXXXX" XXXXX is the location of your fastboot ADB folder
   "fastboot erase cache"

Reference:

http://www.pdaviet.net

Source:
http://www.pdaviet.net/showthread.php?207202-huong-dan-chi-tiet-unlock-bootloader-cho-cac-may-htc/page16

Thursday, May 2, 2013

Javascript - Script tag in head or bottom of HTML

There are two possibilities for truly unobtrusive scripts:
  • including an external script file via a script tag in the head section
  • including an external script file via a script tag at the bottom of the body (before </body></html>)
The second one can be faster as the original Yahoo research showed some browsers try to load script files when they hit the script tag and therefore don't load the rest of the page until they have finished. However, if your script has a 'ready' portion which must execute as soon as the DOM is ready you may need to have it in the head. Another issue is layout - if your script is going to change the page layout you want it loaded as early as possible so your page does not spend a long time redrawing itself in front of your users.
If the external script site is on another domain (like external widgets) it may be worth putting it at the bottom to avoid it delaying loading of the page.
And for any performance issues do your own benchmarks - what may be true at one time when a study is done might change with your own local setup or changes in browsers.

Reference: http://stackoverflow.com/questions/143486/unobtrusive-javascript-script-at-the-top-or-the-bottom-of-the-html-code