Monday, August 15, 2016

Updating automated caption and cross-reference numbering

  1. Press Ctrl+A to select the entire document.
  2. Right-click on the selection, and select Update Field
Once you’ve updated the caption numbering and the x-refs, you may need to update the automated Table of Contents (TOC), List of Tables (LOT), and List of Figures (LOF) too. Sometimes these elements update as part of the steps above, but not always.
  1. Make sure Track Changes is still off.
  2. Click anywhere inside the TOC.
  3. Go to the References tab (#1 in the image below), Table of Contentsgroup on the ribbon (far left), then click Update Table (#2 in the image below). If asked, select the option to Update entire table.
  4. Click anywhere inside the LOT.
  5. Go to the References tab, Captions group on the ribbon (middle), then click Update Table (#3 in the image below). If asked, select the option toUpdate entire table.
  6. Click anywhere inside the LOF.
  7. Go to the References tab, Captions group on the ribbon (middle), then click Update Table (#3 in the image below). If asked, select the option toUpdate entire table.
Source: https://cybertext.wordpress.com/2014/01/31/word-updating-automated-caption-and-cross-reference-numbering/

Add chapter numbers to captions in Word


If you're writing a multi-chapter document, such as a book, that includes figures, you may want to have your figure captions prefaced with the number of the chapter the figure appears in. Fortunately it's not hard to add chapter numbers to your captions and have them automatically update if you move a figure from chapter to chapter in the course of editing.

Include chapter numbers in captions

To include chapter numbers in captions, you must use a unique heading style for chapter headings. For example, if you use the Heading 1 style for chapter headings, do not use the Heading 1 style for any other text in the document.
Step 1: Apply numbering to the chapter headings in your document
  1. Select the first chapter heading in your document.
  2. On the Home tab, in the Paragraph group, click the arrow next to Multilevel List.
    Multilevel List button
  3. Click a chapter-numbering list definition (one that includes the text Heading 1 or Chapter 1).
    Use the Chapter Headings mutlilevel list to format chapter headings to be included in captions.
    The chapter-numbering list definition will be automatically applied to all of the headings in your document that used that style (i.e. Heading 1 in this example).
Step 2: Add chapter numbers to captions
  1. Select the object (table, equation, figure, or another object) that you want to add a caption to.
  2. On the References tab, in the Captions group, click Insert Caption.
    Office 14 Ribbon
  3. In the Label list, select the label that best describes the object, such as a figure or equation. If the list doesn't provide the label you want, click New Label, type the new label in the Label box, and then click OK.
    Use the caption dialog to set options for your figure, table or equation captions.
  4. Type any text, including punctuation, that you want to appear after the label.
    Type any optional custom text for your captions in the label field.
  5. In the Caption dialog box click Numbering.
  6. Select the Include chapter number check box.
    Use the caption numbering dialog to add chapter numbers to captions.
  7. In the Chapter starts with style list, select the heading style that was applied to the chapter heading.
  8. In the Use separator list, select a punctuation mark to separate the chapter number from the caption number. In this example a hyphen has been selected so the caption on the first image in Chapter 2 would appear as "Figure 2-1".
  9. Click OK.
https://support.office.com/en-us/article/Add-chapter-numbers-to-captions-in-Word-76aa8706-3453-4a72-ad5c-b87d90ce1698

Sunday, August 14, 2016

How to import styles from one document to another document in word?

Step 1: Open the document you want to import style to in Word then click File > OptionsCustom Ribbon to add the Developer under the Main Tabs to ribbon. See screenshot:
Step 2. Click Document Template under Develop Tab, there will be a popup dialog, and click Organizer. See screenshot:

Step 3. There will be another popup dialog, click Close File in the right, and the check box will be replace with Open File. See screenshot:
Step 4. Click Open File, and select the file you want to import style from, then click Open.
You can search the file you want according to the format by clicking A, and also can enter the name of the file in File name box to quickly search it.
Step 5. After opening the file you want to import style from, you can select the style of the file in the right box and click Copy, it will copy the style to the left box. See screenshot:
Note:
1. Where the  
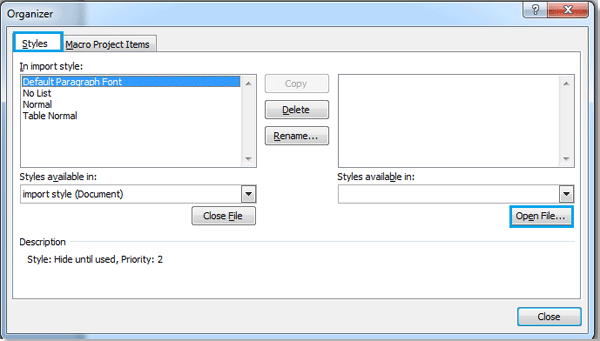
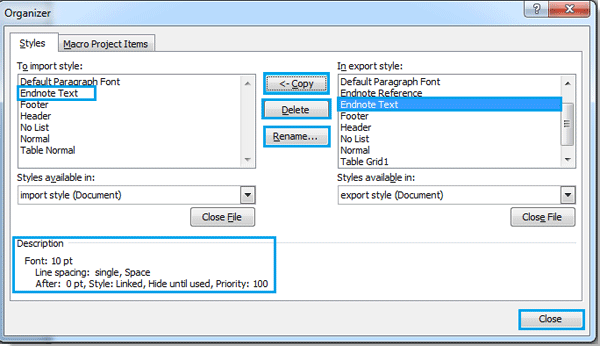
arrow point to will be the place import style. And these two files can copy the style from each other. (Press Ctrl+click or Shift + click to select multiple styles)
2. You also can delete or rename the style.
3. There will be a description under the left box when you select a style in the box.
Step 6. After the copy, click Close, the style importing is finished.
Source: https://www.extendoffice.com/documents/word/1004-word-import-styles.html

Tuesday, August 2, 2016

Auto Start App in Mac

Click on the Apple icon (left top of your screen) > System Preferences > Users & Groups.
Then, default, the "Password" button is selected on top. Click the other button "Login Items".
Here you can add items, applications, folders, even network locations which will be started upon login.
Find Skype in your Applications and add it and it'll start automatically when you startup your Mac