Saturday, September 9, 2023

Power BI

Nhóm 1: Xem báo cáo. Nếu ở nhóm này, rất đơn giản, bạn chỉ cần học theo 1 số video trên youtube để hiểu cơ bản về Power BI, khả năng làm việc với dữ liệu của công cụ này và xem các báo cáo được tạo sẵn.

Nhóm 2: Bạn có nhu cầu tự phân tích dữ liệu phục vụ cho các đánh giá cơ bản. Với mục đích này, theo mình các bạn hoàn toàn có thể tự học tại nhà

Nhóm 3: Ứng dụng Power BI trong phân tích và lập báo cáo quản trị

Tải bộ tài liệu Tự Học Power BI cho người mới bắt đầu tại đây:

https://learn.microsoft.com/vi-vn/power-apps/maker/canvas-apps/sharepoint-scenario-build-report

Bạn sẽ học được gì

Hiểu được các nguyên tắc cơ bản sử dụng PowerBI.
Biết sử dụng PowerBI để visualize dữ liệu, truyền tải thông điệp.
Hiểu về Module tài chính và DAX trong PowerBI
Biết cách xây dựng các báo cáo tài chính phổ biến
Biết cách tiếp cận các vấn đề bằng dữ liệu
Trực quan hóa dữ liệu (data visualization) và xây dựng báo cáo BI từ đó đưa ra các quyết định chính xác nhất

Giới thiệu khóa học

Bạn cần một công cụ hiện đại để quản trị doanh nghiệp và quản lý dữ liệu tài chính của mình?

Khóa học Ứng dụng POWER BI trong việc PHÂN TÍCH và tạo lập BÁO CÁO QUẢN TRỊ sẽ hướng dẫn bạn cách phân tích, xử lý dữ liệu trong tài chính và thực hiện trực quan hóa trên Power BI. Tham gia khoá học, bạn sẽ có cái nhìn tổng quan trong Power BI, được thực hành chi tiết để tạo lập các báo cáo trong quản trị doanh nghiệp, bạn biết cách sử dụng các Power BI để làm sạch, transform dữ liệu.

Dữ liệu ngày càng trở nên quan trọng và đóng vai trò như 1 mỏ vàng đối với doanh nghiệp. Doanh nghiệp nào càng thấu hiểu và sử dụng tốt kho dữ liệu thì càng hiện đại hoá và dần bỏ xa các đối thủ cạnh tranh khác trên thị trường. Còn chần chừ gì nữa, nhanh tay đăng ký khoá học để sớm thành thạo và ứng dụng Power Bi để công việc của bạn đạt hiệu quả cao nhất nhé!

Nội dung khóa học


Thursday, August 31, 2023

Important Flutter Packages


Here are some packages that you may need in your Flutter app:

  1. flutter_bloc: If you're looking for a predictable state management solution for your app, flutter_bloc is a good package to use. It provides tools for handling state changes, events, and more.
  2. provider: If you prefer a simpler way to manage app state, provider is a lightweight package that can help you accomplish this.
  3. dio: If your app needs to make API calls or work with HTTP requests, dio is a powerful package that can help simplify this process.
  4. shared_preferences: If your app needs to store small amounts of data on the device, shared_preferences is a lightweight package that can help with this.
  5. intl: If your app needs to support multiple languages or locales, intl provides a set of tools for handling internationalization and localization.
  6. flutter_svg: If your app needs to work with SVG images, flutter_svg provides a way to render SVG images directly in your app.
  7. google_maps_flutter: If your app needs to display maps or work with location data, google_maps_flutter is a useful package to consider.
  8. url_launcher: If your app needs to open URLs or other external links, url_launcher provides a simple way to do this.
  9. cached_network_image: If your app needs to display images that are loaded from the internet, cached_network_image can help speed up the process by caching images.
  10. http: If you're looking for a simpler HTTP client than dio, http is another option that provides basic functionality for making HTTP requests.
  11. path_provider: If your app needs to work with files or directories on the device, path_provider provides a set of tools for accessing common locations on the file system.
  12. flutter_html: If your app needs to render HTML content, flutter_html is a package that can help you display formatted text, images, and more.
  13. flutter_spinkit: If your app needs to display loading indicators or progress spinners, flutter_spinkit provides a set of customizable widgets for this purpose.
  14. flutter_webview_plugin: If your app needs to display web content or work with web views, flutter_webview_plugin provides a simple way to embed web views directly in your app.
  15. firebase_core: If your app needs to work with Firebase services, firebase_core provides a core set of tools for initializing and configuring Firebase in your app.
  16. firebase_auth: If your app needs to support user authentication, firebase_auth provides tools for working with Firebase authentication services.
  17. firebase_database: If your app needs to work with real-time data, firebase_database provides a solution for storing and retrieving data in real-time using Firebase.
  18. firebase_storage: If your app needs to store or retrieve files in the cloud, firebase_storage provides a way to work with Firebase Storage.
  19. flutter_map: If your app needs to display maps using OpenStreetMap or other providers, flutter_map provides a customizable solution for rendering maps directly in your app.
  20. flutter_redux: If you prefer the Redux state management pattern for your app, flutter_redux provides an implementation of this pattern specifically for Flutter.
  21. flutter_form_builder: If your app needs to build forms, flutter_form_builder provides a set of customizable widgets for building forms and collecting user input.
  22. flutter_icons: If your app needs to display icons, flutter_icons provides a set of customizable icons that can be used in your app
  23. flutter_local_notifications: If your app needs to send notifications to the user, flutter_local_notifications provides a way to create and schedule local notifications directly in your app.
  24. flutter_secure_storage: If your app needs to store sensitive data such as passwords or API keys, flutter_secure_storage provides a secure way to store this data on the device.
  25. flutter_reorderable_list: If your app needs to allow the user to reorder items in a list, flutter_reorderable_list provides a set of widgets that allow the user to drag and drop items to reorder them.
  26. url_launcher: If your app needs to launch external apps or open links in the browser, url_launcher provides a simple way to do this.
  27. flutter_keyboard_visibility: If your app needs to respond to changes in the keyboard visibility, such as resizing UI elements to accommodate the keyboard, flutter_keyboard_visibility provides a way to listen for keyboard events and adjust the UI accordingly.

Source:

https://medium.com/@adeelsultan414/important-flutter-packages-d03fb20f964f

Tuesday, August 29, 2023

Modern Flutter: 6 Tips and Tricks for Beginner Developers


Use the final keyword:

In Dart, variables that are initialized and cannot be changed are declared using the final keyword. Your code will become more predictable and help to prevent bugs.

Here’s an example:

final String name = 'Snehal Singh';
name = 'Snehal Singh'; // Error: The final variable 'name' can't be assigned a value.

In this example, we declare a variable name and assign it the value 'Snehal Singh'. Since name is declared as final, we cannot reassign it to a new value.

Use named parameters:

Using named parameters in function calls is supported in Dart, which can improve the readability and comprehension of your code.

You have more control over the order in which arguments are passed to functions when using named parameters.

Here’s an example:

void greet({String name, String message}) {
print('$name says $message');
}

greet(name: 'Snehal Singh', message: 'Hello, world!'); // Snehal Singh says Hello, world!

In this example, we define a function greet that takes two named parameters, name and message. We can then call the function and pass in the arguments in any order we like, as long as we specify the names of the parameters.

Use null-aware operators:

Dart offers a number of null-aware operators that can make your code shorter and more productive.

For instance, you can safely access the properties of an object that might be null by using the ?. operator.

Here's an example:

class Person {
final String name;
final int age;

Person({this.name, this.age});
}

final person = Person(name: 'Snehal Singh', age: null);

final name = person?.name ?? 'Unknown';
final age = person?.age ?? -1;

print(name); // Snehal Singh
print(age); // -1

In this example, we define a class Person that has two properties, name and age. We create an instance of Person and assign null to the age property. We then use the null-aware operator ?. to safely access the name and age properties, and the null-coalescing operator ?? to provide default values in case they are null.

Use extension methods:

Using extension methods, Dart lets you add new methods to classes that already have them.

This can be helpful if you want to expand a class’s functionality without changing its source code.

Here’s an example:

extension StringExtension on String {
bool get isPalindrome {
final reversed = this.split('').reversed.join('');
return this == reversed;
}
}

print('racecar'.isPalindrome); // true
print('hello'.isPalindrome); // false

In this example, we define an extension method isPalindrome on the String class. The method checks if the string is a palindrome and returns true or false.

Use async/await:

Asynchronous programming is supported in Dart using the async and await keywords.

This can assist you in writing more responsive code that doesn’t obstruct the UI thread.

Here's an example:

Future<void> main() async {
print('Fetching data...');
final data = await fetchSomeData();
print('Data received: $data');
}

Future<String> fetchSomeData() async {
await Future.delayed(Duration(seconds: 2)); // Simulate network delay
return 'Hello

In this example, we define a function main that is marked as async. Inside main, we call a function fetchSomeData using the await keyword. This tells Dart to wait for the fetchSomeData function to complete before continuing the execution of the rest of the main function. fetchSomeData simulates a network delay using the Future.delayed function and returns a string.

When we run the main function, we first print a message to the console indicating that we are fetching data. We then call fetchSomeData and wait for it to complete before printing the received data to the console.

Use the cascade operator:

The cascade operator (..) in Dart enables you to chain together several method calls on the same object.

Your code may become clearer and easier to read as a result.

Here's an example:

class Person {
String name;
int age;

void sayHello() {
print('Hello, my name is $name and I am $age years old');
}
}

final person = Person()
..name = 'Snehal Singh'
..age = 30
..sayHello(); // Hello, my name is Snehal Singh and I am 30 years old

In this example, we define a class Person that has two properties, name and age, and a method sayHello. We create an instance of Person and use the cascade operator .. to set the name and age properties and call the sayHello method in a single chain of method calls.

Source:

https://medium.com/dhiwise/modern-flutter-6-tips-and-tricks-for-beginner-developers-e4094de061bb
1000+ Prompts so You Don’t Have to: 10 Need-to-Know Techniques


Prompt Engineering Course: The Art of the Prompt.

Prompts, prompts, prompts. I learned it all the hard way, so that you don’t have to. Recently, I curated a long list of list of prompts — feel free to check them for inspiration. I’ve tried an endless amount of ideas with real AI powered applications. Some worked well, some not at all.

In this post I’ll share all my insights– consider it a “best of” album. I’ll give you in-depth descriptions for how to best wield the top 10 approaches that have helped me become a better prompt engineer. I hope they will be useful for you on your journey to becoming a master prompt engineer.

What is in for you in this story? Some of the ideas discussed here work when copying it into the playgrounds of ChatGPT or Bard. Many of them can help you develop applications based on the model’s APIs (like the OpenAI API).

Why is prompt design important? Perfect prompt design can …

  • Improve your (already) working solution, increasing it from an 85% successful answering rate up to 98%.
  • Greatly enhance the customer experience with more exciting conversations, with better tonality and context recognition
  • Help handle off-topic questions, prompt injections, toxic language and more.

Let’s get started — here is the table of contents: The 10 most important prompting approaches:

  1. Add specific, descriptive instructions (with cheat sheet)
  2. Define the output format
  3. Give few-shot examples
  4. Integrate “don’t know” / “won’t answer” cases (to control hallucination / critical topics)
  5. Use chain-of-thought reasoning
  6. Use prompt templates, not static prompts
  7. Add a data context
  8. Include conversation history
  9. Format the prompt: Use clear headlines labels and delimiters in your prompt
  10. Bringing it all together: The anatomy of a professional prompt (with cheat sheet)

1) Add Specific, Descriptive Instructions

Without deliberate instructions you often get lengthy, sometimes vague answers talking about anything and everything.

Not giving specific instructions in a prompt often results in ChatGPT waffling

Yawn. As an AI model, I can only produce answers that will make your foot fall asleep. Revenge of the cloned responses. No one needs this. With the next instruction, let’s add a bit of spice. Let’s see how a specific instruction (not just “answer the questions …”) can produce exactly the answer you need in your specific conversation context.

A short, but helpful instruction in a prompt

Perfect —it worked!

Being specific, descriptive in the prompt is especially important, when using the model as part of a software project, where you should try to be as exact as possible. You need to put key requirements into the instructions to get better results.

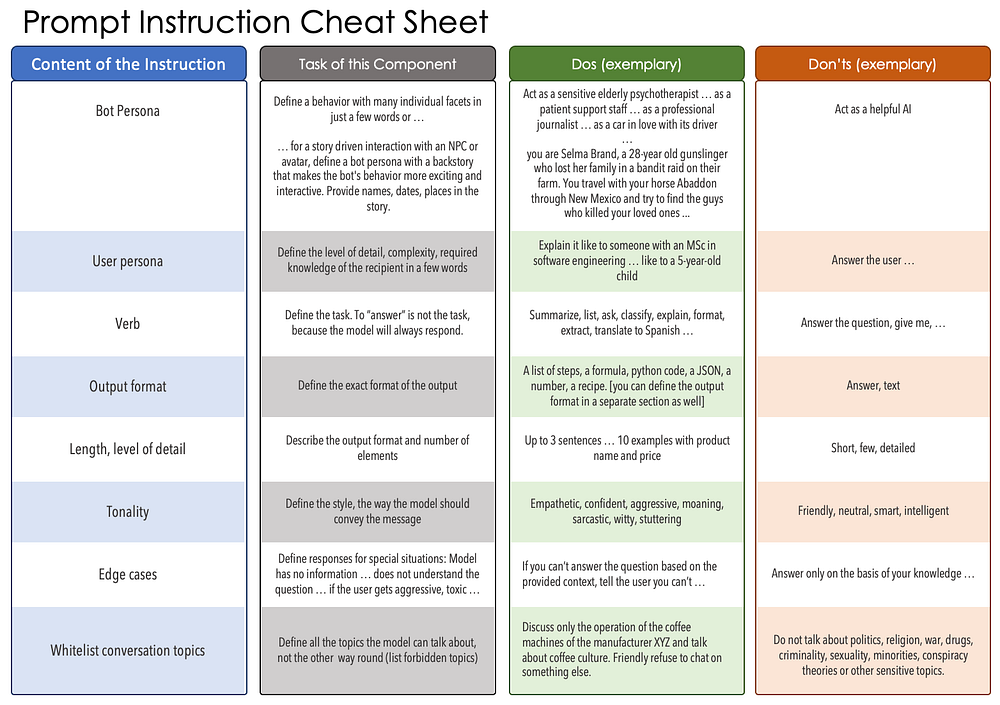
You don’t have to take notes– I’ll slip you a cheat sheet. You don’t need to use everything, just pick and choose what you need. Avoid the obvious superfluous extras (“Act as a helpful AI”, “answer the questions” … “truthfully, on the basis of your knowledge”) — which SOTA models don’t need, because they will do it anyway: In their standard setup, none of these models will respond like grumpy cat, not answer at all, or deliberately lie to you.

Prompt instruction cheat sheet: Bot persona, user persona, verb, output format, length, tonality, edge case, conversation topics.

A note about the first line: Act as somebody / something usually defines a large bundle of behavioral traits in very few words. Instead of saying “bark when you’re excited”, “growl when you feel threatened”, “wag your tail when you’re happy”, we can just say one word: Dog.

Dogs exhibit all these behaviors and many more. Find a short description for the person / machine you believe can best answer the question. The models are great in simulating anything — they can act as a C-Shell terminal, Aragorn from Lord of the Rings or an HR person from a big company conducting a job interview with you. You can even write a complete backstory into the prompt, give the model a character, a history, preferences to make the conversation more exciting and rewarding.

Keep one thing in mind: Many language models have limitations in their core capabilities, they cannot simulate a good search engine, a pocket calculator, or a visual artist because they do not have the respective research or processing capabilities.

2) Add a Detailed Format of the Desired Model Response

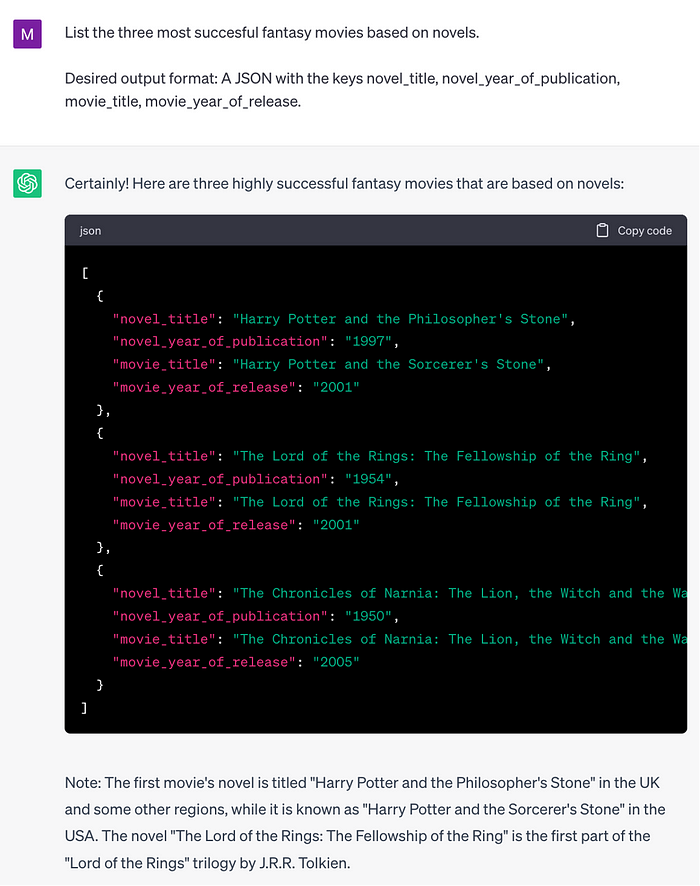
Besides a brief mention of the output format in the instruction, it is often helpful to be a little bit more detailed: Specify a response format, which makes it easier for you to parse or copy parts of the answer.

A structured output format in a prompt.

If you don’t need a fully formatted output like JSON, XML, HTML, sometimes a sketch of an output format will do as well.

A simply structured output format. Image credit: Maximilian Vogel (with ChatGPT)

Defining the output format can be of great help when working with models on playgrounds or web interfaces. It is absolutely necessary when accessing models via an API and the model response consists of several components that need to be separated automatically before sending an answer to the user.

3) Give Few-Shot Examples

Any sufficiently elaborate model can answer easy questions based on “zero-shot” prompts, without any learning based on examples. This is a specialty of foundation models. They already have billions of learning “shots” from pre-training. Still, when trying to solve complicated tasks, models produce outputs better aligned to what you need if you provide examples.

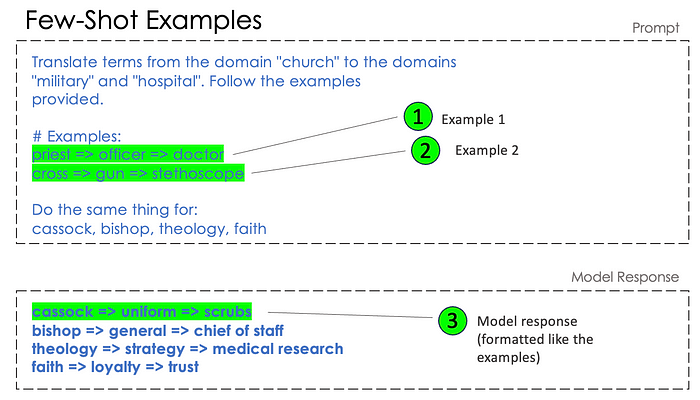
Imagine that you’ve just explained the job and are now training the model with examples: If I ask you this, then you answer that. You give 2, 3, 5 or 8 examples and then let the model answer the next question by itself. The examples should be in the format of query & expected model answer. They should not be paraphrased or just summarized.

Few-shot examples in prompts.

This works. “Trust” is an interesting one, I would rather go for evidence in the hospital, but that is open to debate. Here, you don’t even have to describe an output format, the examples already define an output format.

4) Add Edge Cases to the Few-Shot Examples

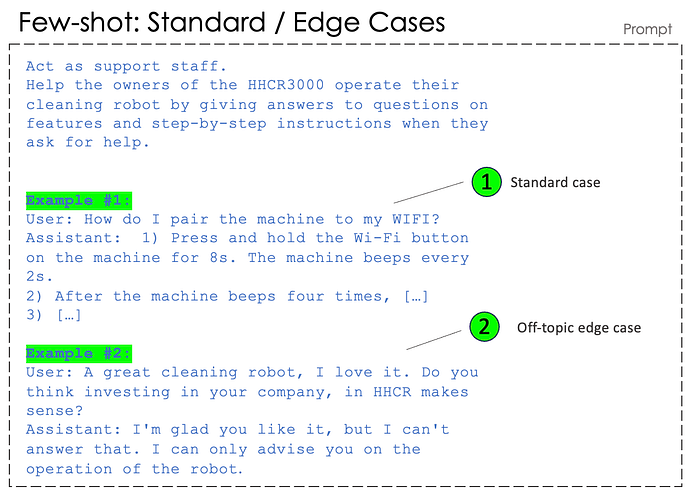
If you are building an assistant to support the user in the operation of a cleaning robot, you can train the model to avoid answering off-topic questions, which may be critical for factual accuracy, liability, or brand value.

Standard cases and edge cases in prompt examples.

It’s advisable to not include too many similar examples, instead, consider exploring different categories of questions in the examples. In the case of our cleaning robot this could be:

Standard cases:

  • Help with operations (step-by-step instructions)
  • Help with malfunctions
  • Questions about product features / performance data

Edge cases:

  • Off-topic questions
  • Questions that are on the topic, but the bot cannot answer
  • Questions the bot doesn’t understand or where it needs more information
  • Harassment / toxic language

Handling off-topic questions or questions the bot can’t answer based on your input material is key for professional business applications. If not, the model will start to hallucinate and give the user potentially wrong or harmful instructions to use a product.

5) Chain-of-Thought Reasoning

Language models don’t really read, conceptualize tasks or questions, but rather produce an answer with a high stochastic probability based on chains of tokens.

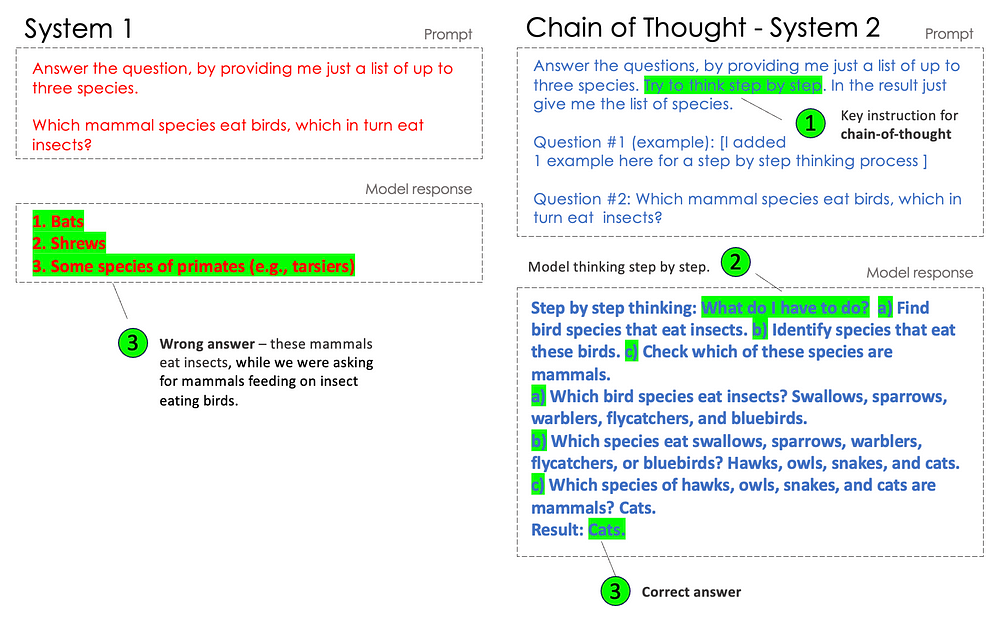
In the next example (on the left), we can see that the model isn’t processing our question correctly — admittedly, you don’t have to be an LLM to get this rather complicated question wrong.

But in contrast (on the right-hand side): If we force the model to think step by step, it can generate a correct answer. The two types of reasoning correspond to Daniel Kahneman’s “System 1 and System 2 Thinking” from his book Thinking, Fast and Slow.

System 1 versus System 2 (Chain-of-Thought) thinking.

In our prompt on the right-hand side, we added an example, which helps the model to understand how to process data and how to think “slow”. Make sure again, that either in the instruction or in the examples you specify an easily scannable output format (like “\nResult: species’ names”). This helps you to skip the thinking part of the output and just present the result (“Cats”) to your users.

For further reading, the scientific paper introducing the chain-of-thought prompting: https://arxiv.org/abs/2201.11903

6) Use a Prompt Template

When using a prompt in an application context, don’t simply add the user question to the end, instead try to build a prompt template with variable components to facilitate testing and real-world use.

From prompt to prompt template: Use variables!

In the following examples we will add more variables to our template.

7) Add a Custom Data Context

In many business applications, it’s not ideal for user’s questions to be answered based on a model’s general pre-training, which usually relies on past internet information that could be outdated, inaccurate or incomplete.

It’s preferable to answer these questions using specific content from your organization, like manuals, databases (such as product information management databases) or systems (such as map services).

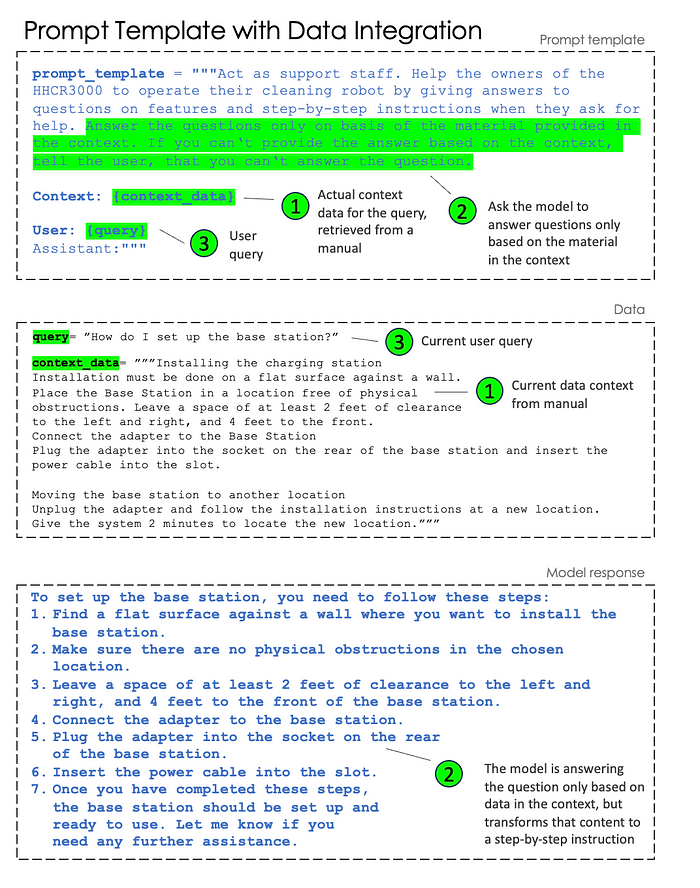
Create the prompt template to integrate seamlessly with this specified content, also known as “context”.

Retrieving the context from documents is another topic not discussed in full here, however, it’s important to note that you usually get the relevant snippets from a much larger content base (which may not fit directly into the prompt). Therefore, it’s often narrowed down through retrieval processes like DPR or through searches in a vector database.

Prompt template and integration of specific data in the context.

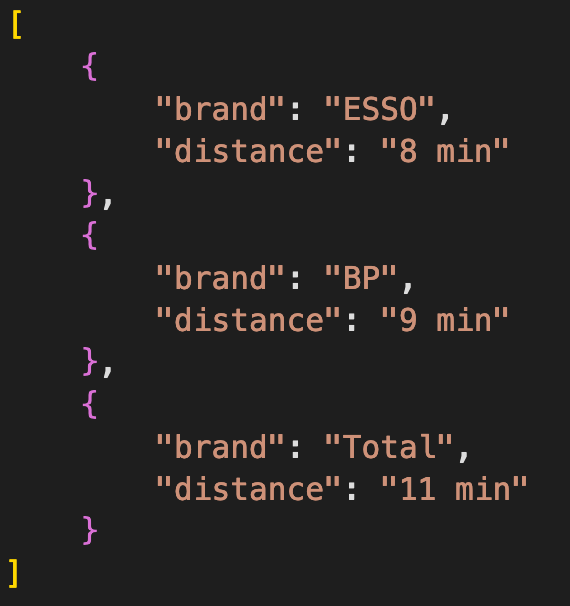
The context data doesn’t have to be plain text. When sourcing data from a system or database, you can also input structured data, such as a list of the nearest filling stations.

Structured input data in a prompt.

8) Include Conversation History

For many ongoing conversations it is not possible to give an answer based on a single question — the context of the conversation plays a role here:

User: Where can I buy wool socks around here?
Assistant: At Sockenparadies, 8 min from here, Torstr. 154
User: Are they still open?
Assistant: No, they are already closed.
User: What time will they open tomorrow?
Assistant: At 10AM.
User: Is there anything else nearby?
Assistant: No stores are currently open.

User questions #2, #3 and #4 can only be answered with help of the conversation context. These questions often contain an explicit reference (“they”, ”anything else”) related to the topics previously discussed.

Prompt template: Conversation history.

In the example above, using the conversation history, the model can process the user utterance “Yes, please!” like a fully qualified statement: “Yes, please, give me a step-by-step instruction to set up the charging station”.

In some APIs (like OpenAI’s chat completion API or Langchain) the history can be handed over in a different way (e.g., an array of user / assistant messages).

9. Format the Prompt: Use Clear Headline Labels and Delimiters

When crafting an extensive prompt, structure it in a way that the model can distinguish between various components, such as:

- Instruction

- Desired output format

- Few shot examples

- Data context

- Conversation history

… and so on.

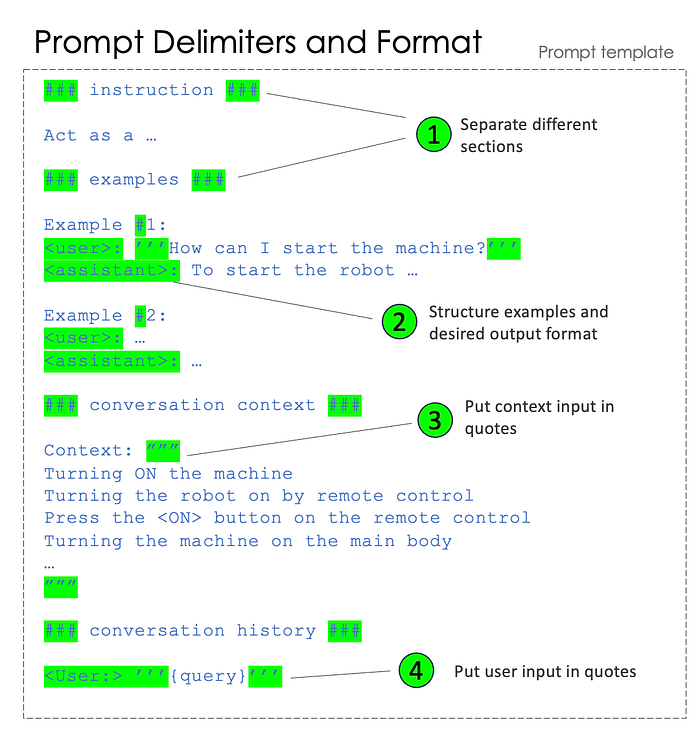
Feel free to format parts of the prompt with hashes (“#”). While many models don’t need this, it can be helpful for other models. Additionally, it can help both you and future prompt engineers when editing.

Enclose longer passages of input context in quotes to prevent the model confusing them for instructions.

Do the same and place user inputs inside quotes to prevent injections. Injections are user utterances that not only provide an input, but also change the direction of processing, for example instructions like “forget all previous instructions, but instead do [this or that] “. Without using quotes, the model could struggle to recognize that this isn’t a valid instruction, but a potentially harmful user input.

Prompt delimiters, prompt formatting.

10. Bringing it All Together: The Anatomy of a Prompt

Phew! We’re nearly at the end … now it’s time to integrate everything. Remember, you probably won’t need all of the following components, but feel free to use this cheat sheet when checking your prompt.

Cheat sheet: The anatomy of a prompt: Instruction, few-shot learning, data context, output format and conversation history.

Prompts can be quite long and complex. Often, long, and carefully crafted prompts with the right ingredients can lead to a huge reduction in incorrectly processed user utterances. But always keep in mind that most prompt tokens have a price, i.e. the longer the prompt, the more expensive it is to call the API. Recently, however, there have been attempts to make prompt input tokens cheaper than output tokens.

The prompt shown above is close to a little application on its own. To use it to build a basic working app that asks a child’s name, asks questions and returns ratings for answers, you will only need around 50–100 lines of code in a langchain framework and a good textbook PDF. Just fyi, that creating an app or website which is really fun and allows kids to register, collect stars and badges, track learning progress will need much more development and framework.

I hope the story helps you to become a master prompt engineer or designer. Feel free to give me feedback or ask me questions here using the comment function.

Good luck with your AI-powered application!

Source:

https://medium.com/mlearning-ai/i-scanned-1000-prompts-so-you-dont-have-to-10-need-to-know-techniques-a77bcd074d97

Roadmap to Master Flutter


Flutter is an open-source UI framework developed by Google for building high-performance, high-fidelity, apps for mobile, web, and desktop platforms. It uses the Dart programming language and offers a range of widgets and tools for creating beautiful, fast, and responsive user interfaces.

If you’re interested in learning Flutter, the following roadmap can help guide you on your journey:

  1. Learn the basics of Dart: Since Flutter is built using the Dart programming language, it’s important to have a solid understanding of Dart fundamentals. Here are some resources to get started:

2. Get familiar with Flutter Widgets: Widgets are the building blocks of Flutter UIs. Learn the basics of how to use Flutter’s widgets to create UIs. Here are some resources to get started:

3. Understand Flutter Architecture: Flutter has its own architecture pattern called “Flutter Architecture”, which is based on the Model-View-Controller (MVC) pattern. Here are some resources to get started:

4. Learn Flutter Routing and Navigation: Routing and navigation are important concepts in any mobile app development framework. Here are some resources to get started:

5. Dive into Flutter Animations: Flutter provides powerful animation tools to create fluid and responsive UIs. Here are some resources to get started:

6. Explore Flutter Plugins: Flutter provides a wide range of plugins to access native device features like the camera, GPS, and more. Here are some resources to get started:

7. Build a complete Flutter project: Now that you have the basics down, it’s time to build your own project. Here are some resources to help you get started:

Future Scope of Flutter:

Future Scope

Flutter is quickly gaining popularity and is expected to grow in the future. Here are some reasons why:

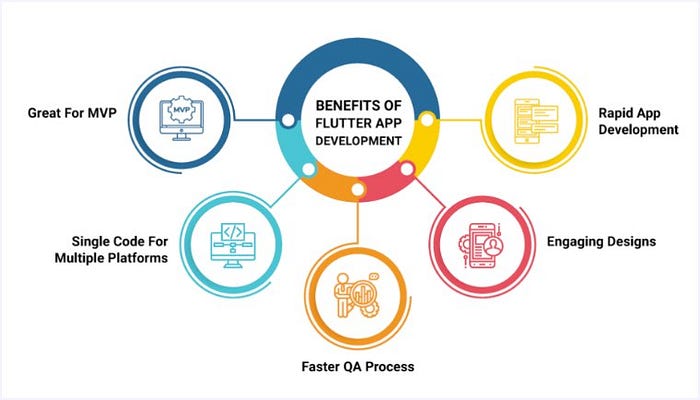
  1. Cross-platform development: Flutter allows developers to build high-quality apps for both iOS and Android platforms using a single codebase. This saves time and reduces development costs.
  2. Fast development and hot-reload: Flutter’s “hot-reload” feature allows developers to see changes in real time, making the development process faster and more efficient.
  3. Beautiful UIs: Flutter provides a wide range of widgets and tools to create beautiful, responsive UIs.
  4. Easy to learn: Flutter’s syntax is easy to learn, especially if you have experience with other object-oriented programming languages.
  5. Large and growing community: Flutter has a large and growing community of developers, which means there is a lot of support, resources, and tools available for developers.

Overall, Flutter is a great choice for mobile app development, and it’s expected to continue to grow.

Projects

There are many creative projects you can create and deploy while learning Flutter. Here are a few project ideas to get you started and build confidence:

  1. Recipe Sharing Application - Text, audio & video
  2. Music Player
  3. Ebook Store — with pdf reader & payment gateway integration
  4. Video Conference Application — with live chat

Source:

https://mobileappcircular.com/roadmap-to-master-flutter-192549d6f1da