ENGINE=InnoDB --> ENGINE=MyIsam
Saturday, August 11, 2018
Step by step tutorial for creating a multilingual Joomla site
Joomla is a widely popular CMS used by millions of websites around the world. The content management system offers a huge number of features and functionalities that serve varieties of purposes. Multiple language support is one of them. Using Joomla, you can launch a multilingual site very easily.
If you were skeptical about the ease, I can ensure, starting a Joomla multilingual website is easier than you could imagine, simpler than it might sound. Let’s see!
In this detailed tutorial, we’ll follow a few steps to create a multilingual Joomla site. If you’ve been puzzled by some other complex tutorials elsewhere online, I’m here to save you. Enjoy the entire process with this piece. Please click any image to enlarge.
Step 1 - Install a new language
In this tutorial, we’ll use English as the default site language, and French as the secondary language to make the target site multilingual. The default language comes ready with Joomla installation. So we need to install the additional language (French, for this case). Let’s go to the Joomla Control Panel > Extensions > Language(s). The following page will arrive.
Figure: Installing a new language in Joomla.
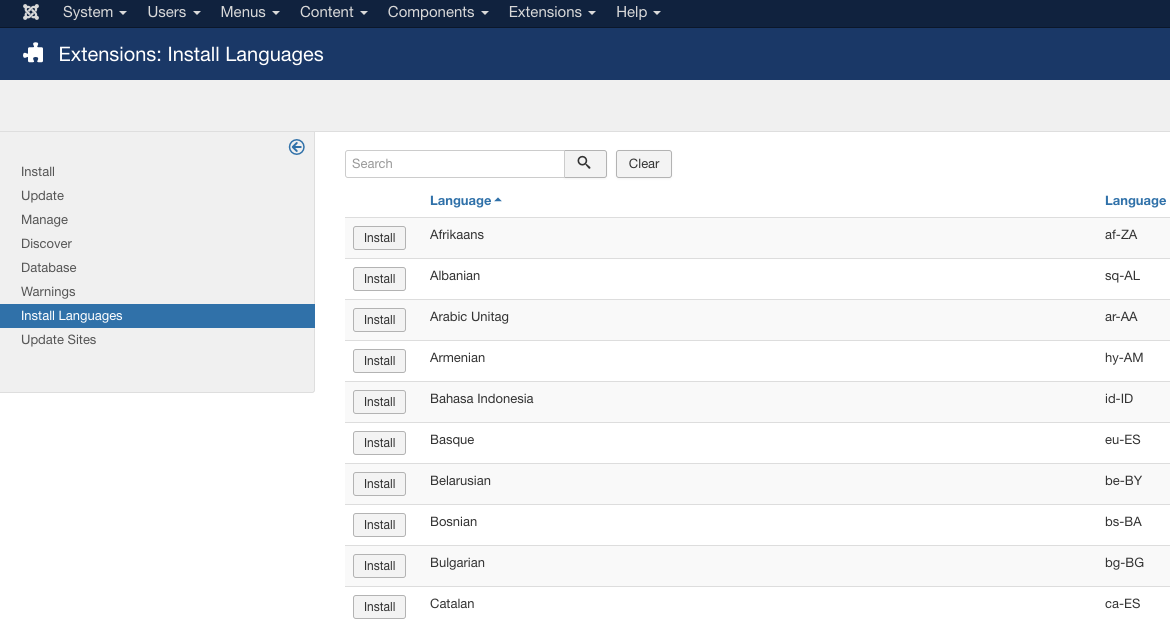
Click the Install Languages button.
Figure: Installable language list in Joomla.
A list of languages will appear. Search and find your desired language, and install. The system will show the message “Installation of the package was successful” upon the language installation.
Step 2 - Create a Content Language
In this step, we will create language profiles for the site contents. Navigate to Extensions > Languages > Content Languages.
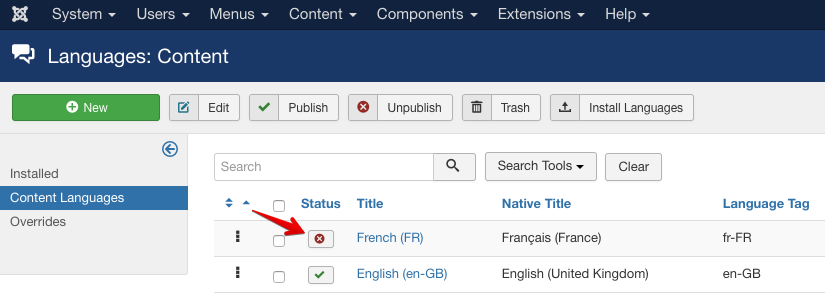
Figure: Joomla content language list.
Publish the newly installed language for using in contents.
Step 3 - Enable the Language Filter and Language Code plugins
So we’ve installed the secondary language and published that for contents. Now we need to enable the Language Filter and Language Code plugins in Joomla. These built-in plugins will help Joomla to filter the contents according to the language we choose.
Go to Extensions > Plugins. Search for “System - Language”.
Figure: Language Code and Language Filter plugins.
Language Filter and Language Code plugins will be displayed in search result. Enable the both plugins.
Step 4 - Adding multilingual contents
We’ve got multiple languages ready on the site. Now let’s add contents in these languages.
Adding categories
At first we will add separate categories for each language.
Go to Content > Category > Add New Category.
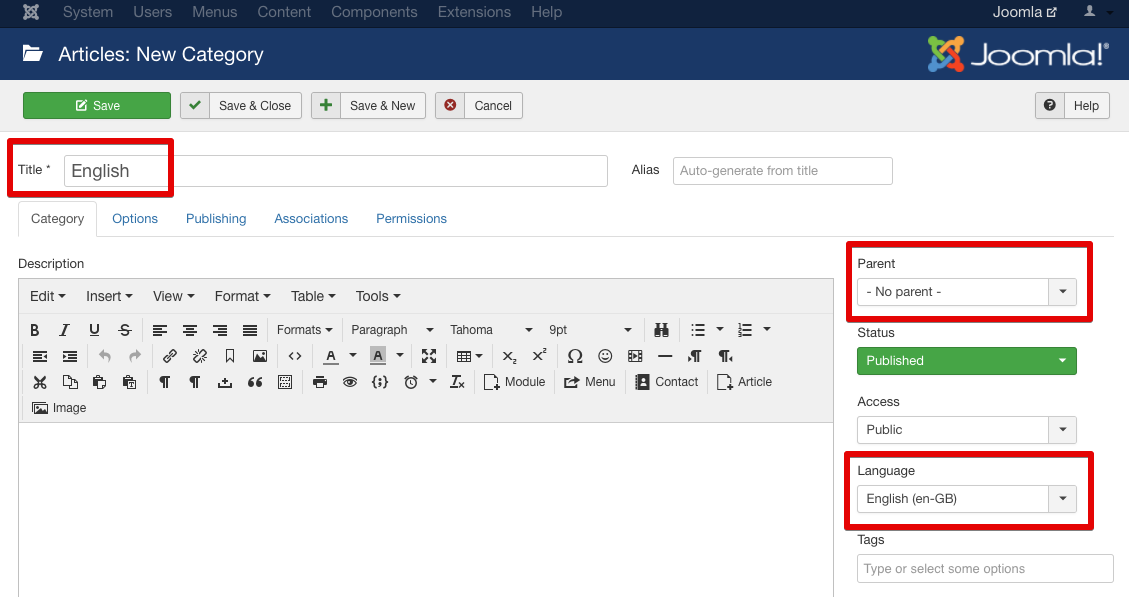
Figure: Adding a language category.
Add two categories for English and French (one for each). For the ‘English’ category, choose the category language as ‘English’ and set ‘No parent’. Publish the category.
For the French category, define the category title as ‘French’, category language as ‘French’ and set ‘No parent’. Save and publish the both categories.
Adding articles
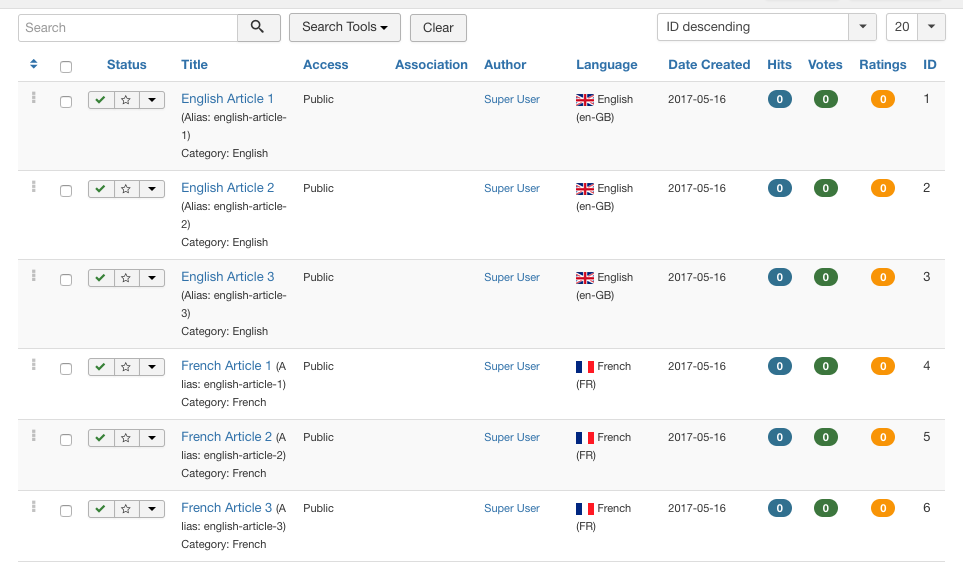
Let’s add 3 articles in English language, and 3 articles in French, so that we could use them in our experimental multilingual site.
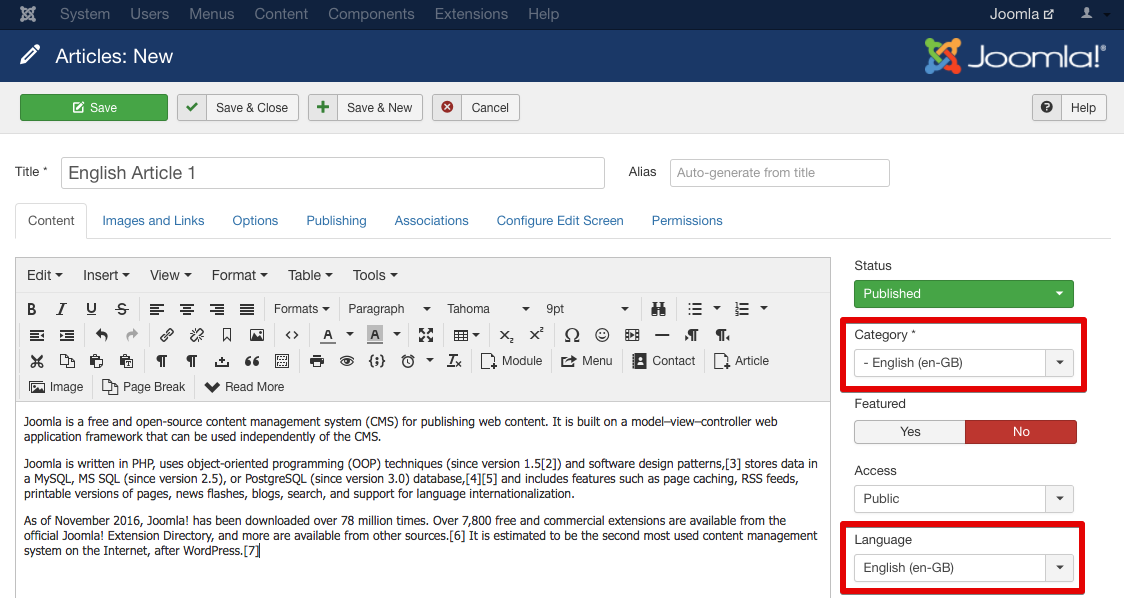
Figure: Adding an article.
After adding 3 English articles, create 3 French articles. Assign the category and article language accordingly.
Figure: Joomla multilingual articles.
Step 5 - Creating menus for multilingual contents
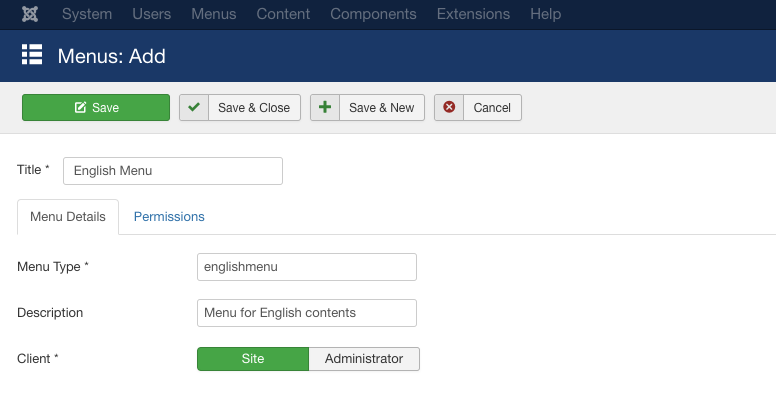
Now we’ll create a menu for the English contents and another menu for French contents. Go to Menus > Manage > Add New Menu. Create a menu for the English language using the following data.
- Title: enter English Menu.
- Menu Type: enter englishmenu.
- Description: enter a description, ‘Menu for English contents’. Click Save & Close to create this menu.
Figure: Creating a menu for the multilingual purpose.
Then create a menu for the French language using the following details.
- Title: enter French Menu.
- Menu Type: enter frenchmenu.
- Description: enter a description, ‘Menu for French contents’. Click Save & Close to create this menu.
Adding menu items
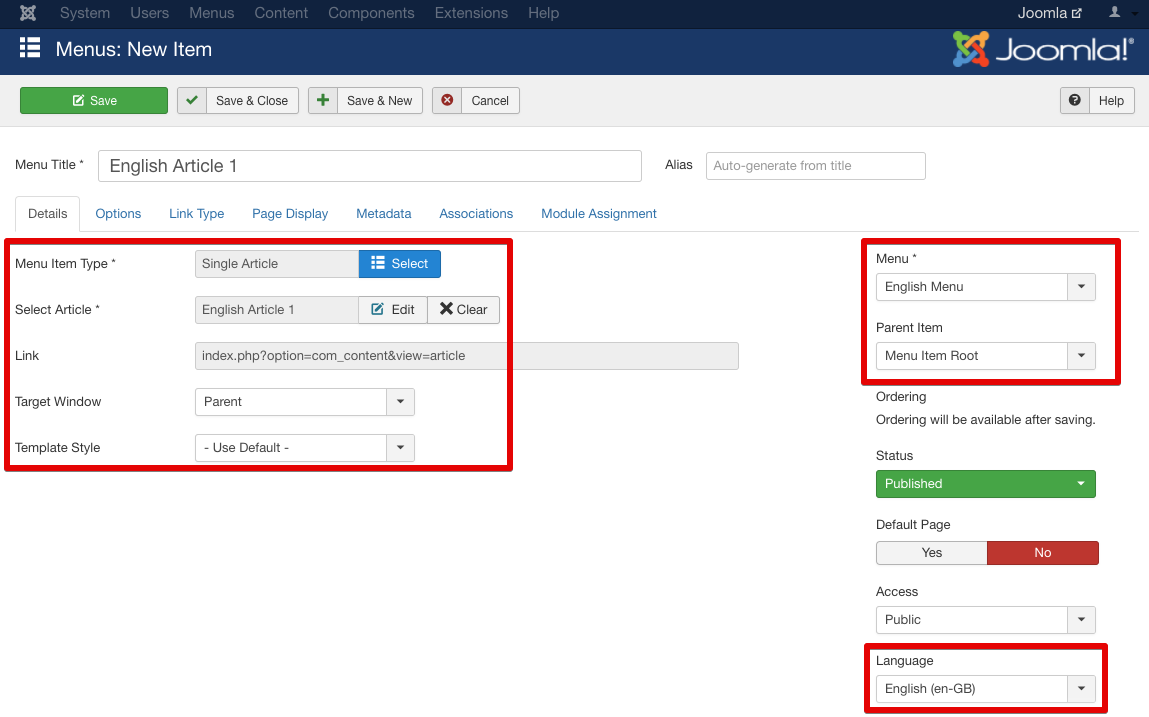
No we need to add menu items to the both menus. Navigate to Menus > English Menu > Add New Menu Item. Use the following details.
- Menu Title: Enter English Article 1.
- Menu Item type: Select the Single Article type.
- Select the Article English Article 1.
- Make sure the Menu location is set to English Menu and the Language to English. Click Save & Close.
Follow the above method to create 3 English menu items for the 3 English articles (you may create more or less menu items, though).
Figure: Adding a menu item.
After creating English menu items, navigate to Menus > French Menu > Add New Menu Item. Enter the following details.
- Menu Title: Enter French Article 1.
- Menu Item type: Select the Single Article type.
- Select the Article French Article 1.
- Make sure the Menu location is set to French Menu and the Language to French. Click Save & Close.
Follow the above method to create 3 French menu items for the 3 French articles (you may create more or less menu items, though).
Assigning language-specific home pages from menu items
Now we have 3 menu items for the English menu, and 3 items for the French menu. From these items, we need to define one menu item for each language’s home page. One for English and another for French.
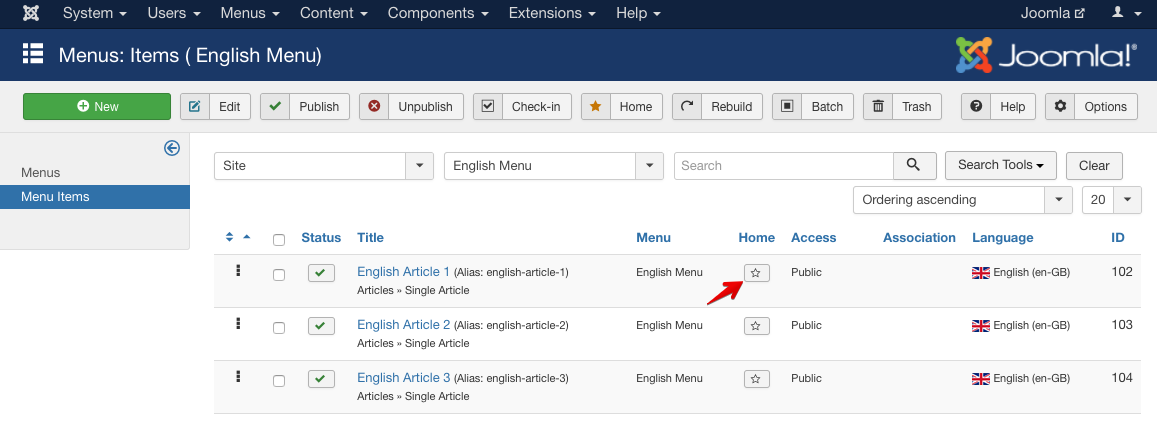
Visit Menus > English Menu and click the star icon for a menu item to assign its content as the English home page.
Figure: Making language-specific home page.
Once a menu item is marked with the star, the language flag will appear in its place. Here is the English homepage effect.
Figure: English-specific home page assigned.
After assigning the English homepage, navigate to Menus > French Menu and mark a menu item as the home page by clicking the star icon.
Figure: French-specific home page assigned.
So the homepage for the French language is assigned.
Connecting the menu items to their translated counterparts
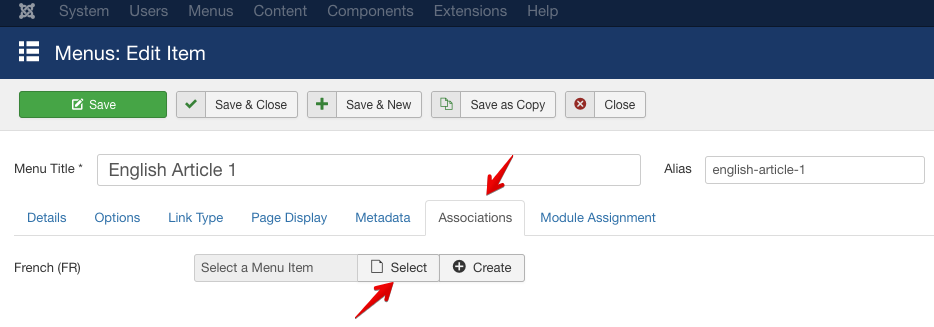
We need to connect the English and French menu items so that users can switch between them. Navigate to Menus > English Menu. Open a menu item and go to the Associations tab.
Figure: Associating two different menu items from different languages.
Select a French article for the English menu item for the association. Save changes. Do it for the remaining English menu items too.That means, associate English Article 1 to the French article 1, associate English Article 2 to the French article 2, and associate English Article 3 to the French article 3.
Figure: Menu association complete.
Association complete.
Display the menus on the frontend
After creating menus, we need to add menu modules to display the menus on the frontend. Navigate to Menu > Manage.
Figure: All menus.
Click on ‘Add a module for this menu’ for the English menu.
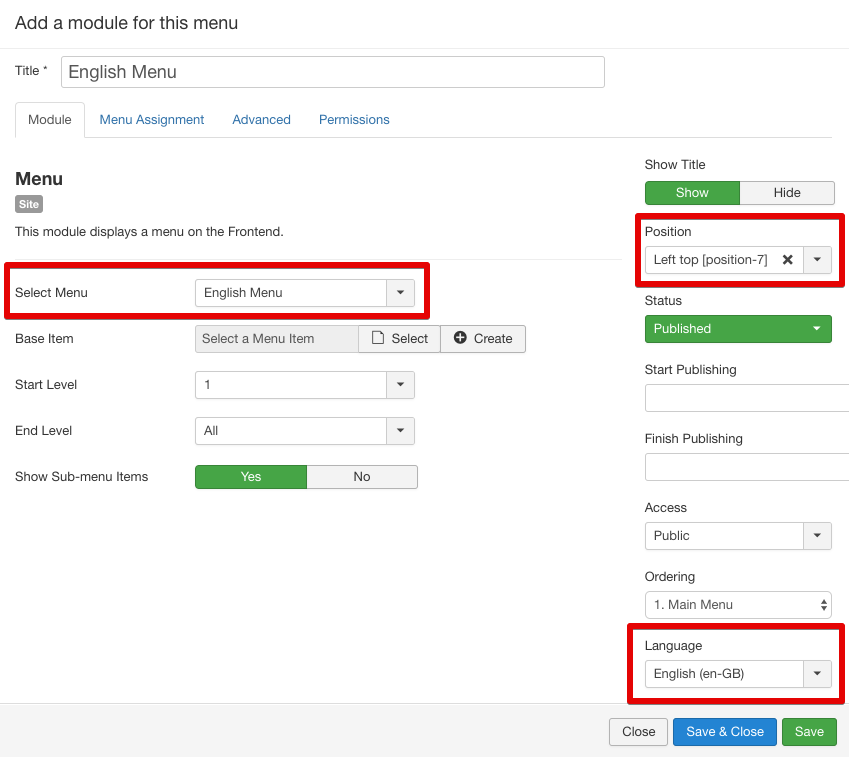
Figure: Configuring the English menu module.
Fill the boxes with the following information.
- Title: English Menu.
- Language: Select English.
- Position: Select position-7. Click Save & Close.
Again Navigate to Menu > Manage. Click on ‘Add a module for this menu’ for the French menu.
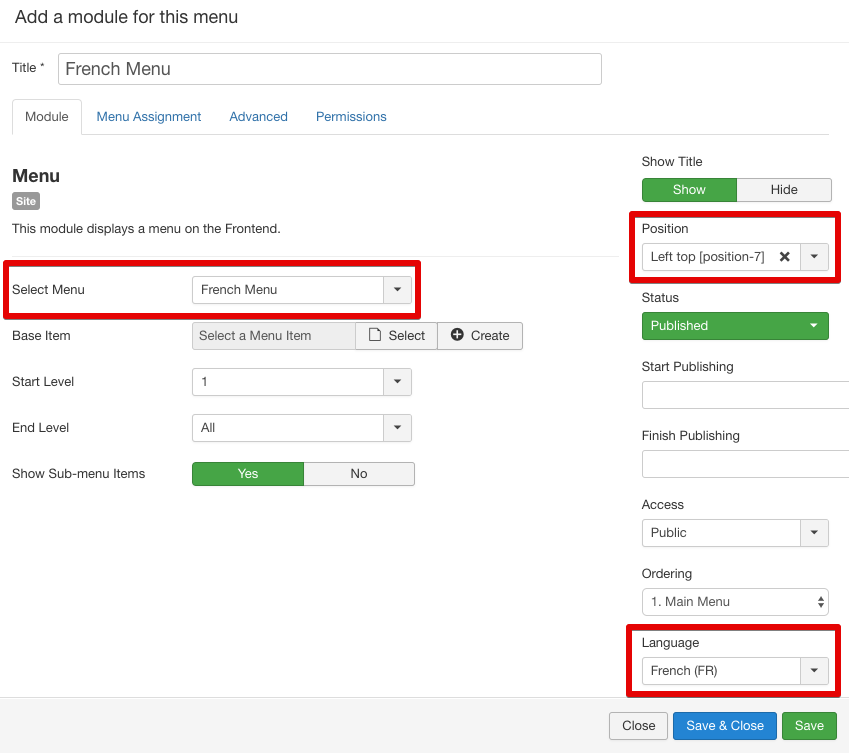
Figure: Configuring the French menu module.
Fill the boxes with the following information.
- Title: French Menu.
- Language: Select French.
- Position: Select position-7. Click Save & Close.
Unpublish the default Main Menu
Finally, unpublish the default Main Menu (because we don’t need to display the auto-generated Joomla default menu on the frontend). Navigate to Extensions > Modules, find the Main Menu module and unpublish it.
Step 6 - Adding the language switcher
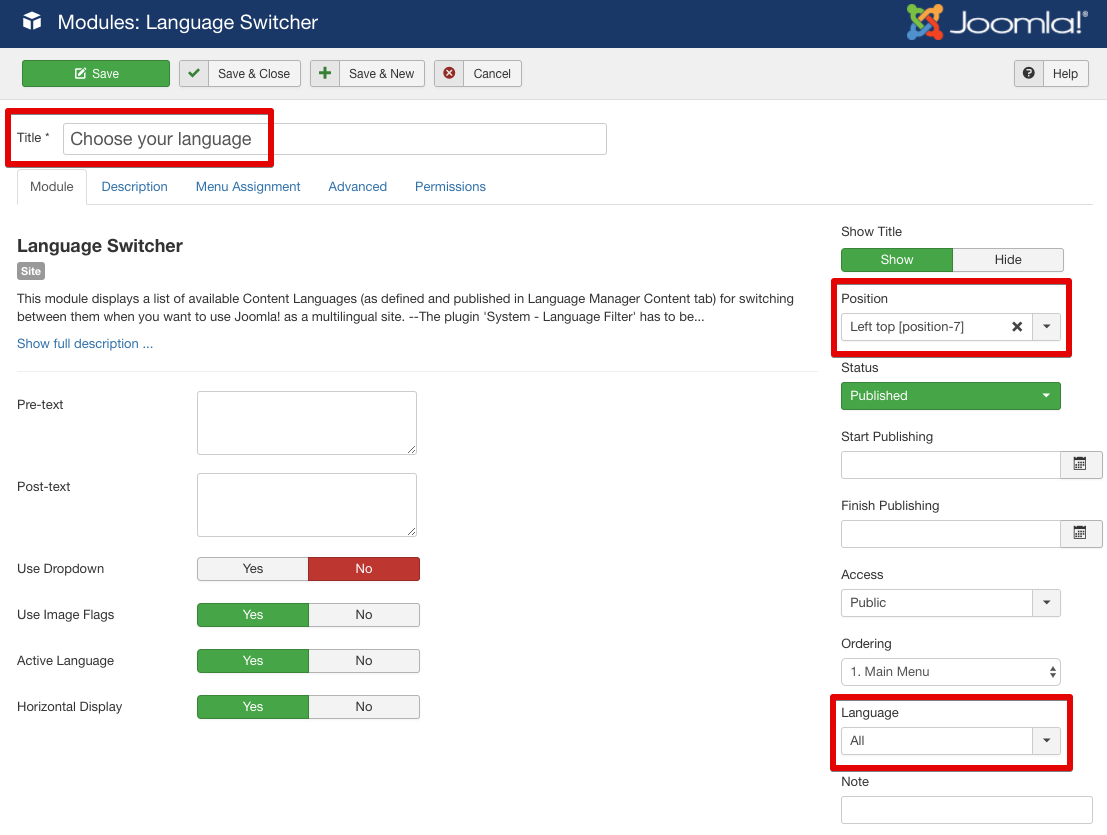
So far, we have two sets of articles and menus. Now we need a mechanism to switch between them. For example, while a visitor is on an English article/page, he/she needs a switcher to visit the French version of the current article/page. To add the language switcher, go to Extensions > Modules, click ‘New’ and select the ‘Language Switcher’ module.
Figure: Configuring the Joomla Language Switcher module.
You can add ‘Choose your language’ as the module title to instruct the visitor. Select the module position as '7', and language as ‘All’. See the screenshot. Save the module. Done!
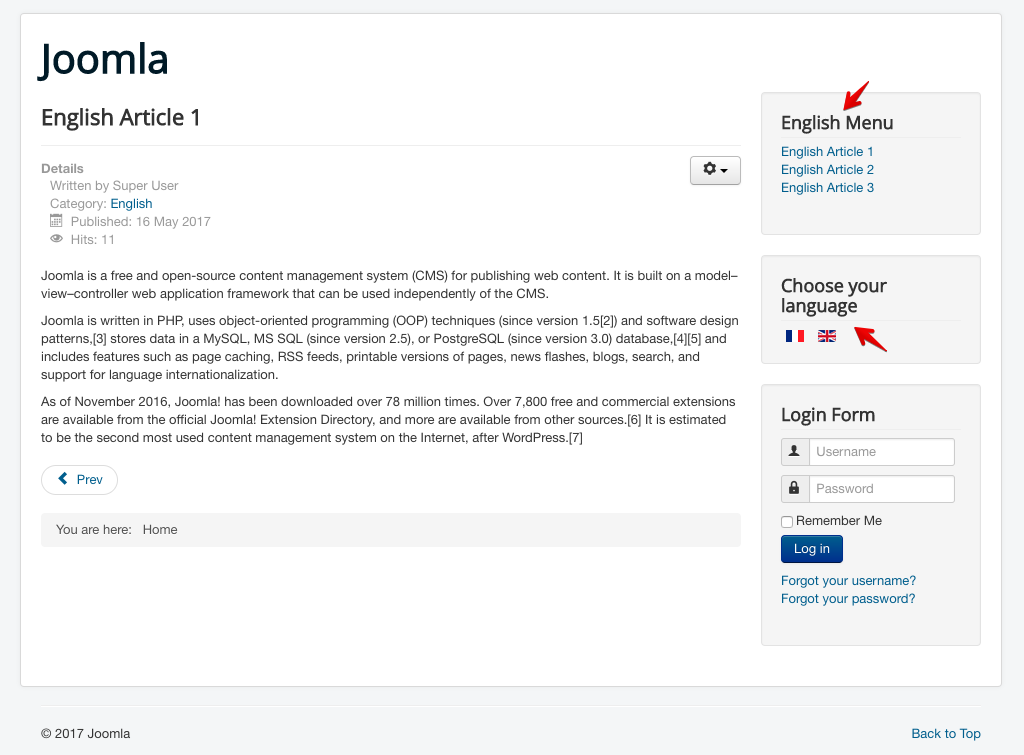
Let’s see the frontend.
Figure: Our experimental multilingual Joomla site frontend.
Very basic, right? You can always modify it with your contents and designs. Use SP Page Builder to easily customize the site design with live frontend drag and drop page composing tools.
Congratulations, you’ve just created a fully functional multilingual Joomla site. Joomla 3.7 comes with a new component ‘Multilingual Associations’ which makes the post-editing of multilingual contents easier ever.
https://www.joomshaper.com/blog/step-by-step-tutorial-for-creating-a-multilingual-joomla-site

